


By Design Bundles
How to Change Cut Lines to Score Lines in Cricut Design Space
As of now, SVGs uploaded to Cricut Design Space will automatically import as a cut file. This may be frustrating if you often make envelopes or cards that require a score line. However, this tutorial will show how you can easily change those cut lines into score lines.
To illustrate this process, we will be using a Floral Birthday Card from Digital Gems.
There are several great greeting card templates available on Design Bundles that you can choose for your project.
To begin, open Design Space and upload the desired SVG. We have a great tutorial for you to follow on uploading SVG designs to Design Space if needed.
Step 1 - Select and Change Line Type
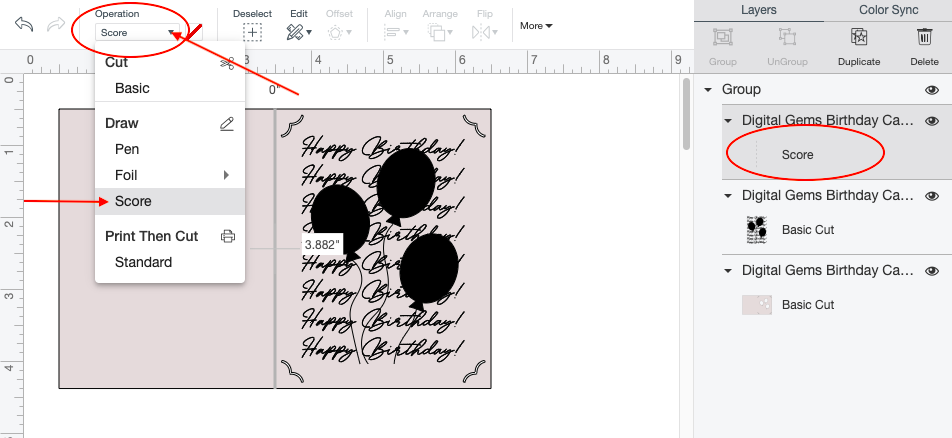
Start by selecting the item that needs to be changed to a score line. You can do this by clicking on the individual object under the Layers panel.

With the item selected, you can now click on the Operation tab on the top toolbar. A pop-up will soon appear that will allow you to change the line type for the selected object. Next, Scroll down and click on the Score button that is under the draw section. Doing this will change the cut line into a score line, which we wanted to achieve today.
Step 2 - Attach Score line
Next, select the score line and card template under you layers panel. After selecting both items, click the Attach button on the lower right-hand corner of the canvas screen. The attach button will bring both selected layers together.

You have successfully changed cut line into a score line. You can now finish up the project by clicking the green Make it button on the upper-right hand corner.
If you liked this tutorial, make sure to check out our guides on how to offset text, and how to make sticker sheets in Cricut Design Space.


